用 YOLO v7 和 EasyOCR 做車牌辨識
文章目錄
資料
資料來源: https://www.kaggle.com/datasets/bomaich/vnlicenseplate (1000 images of Vietnamese License Plate) 用這個資料集的主要原因是, 他有提供 bounding box, 直接標出車牌的座標, 這樣就不用花人力去標記.
YOLO
參考: https://www.kaggle.com/code/bomaich/yolo-v7-license-plate-detection
-
設定檔 data_LP.yaml:
1names: 2 - LP 3nc: 1 4train: c/train 5val: c/valid -
訓練指令:
1pip install -r requirements.txt 2python train.py --batch 16 --cfg cfg/training/yolov7.yaml --epochs 30 --data data_LP.yaml --weights 'yolov7.pt' --device 0 -
最後產生模型於這個位置 runs/train/exp/weights/best.pt
EasyOCR
OCR 的部分直接使用 EasyOCR 產生的 pretrained model, 參數如下:
- ocr.py: 自己寫的程式 (程式碼在文章最後面), 目的是呼叫 EasyOCR 判讀 bbox.txt 指定的範圍, 然後把 OCR 結果寫回照片 (檔名會是 xxx_tagged.jpg)
- image.jpg: 要判讀的照片 (直接拿這個資料集的任一張即可)
- bbox.txt: bounding box (直接拿這張照片對應的 .txr 即可, 他會放在 labels 目錄下)
-
指令:
1$ pip install easyocr 2$ python ocr.py path/to/image.jpg path/to/bbox.txt 3License plate: AR02BP2454 (Score: 0.8545837298766594) -
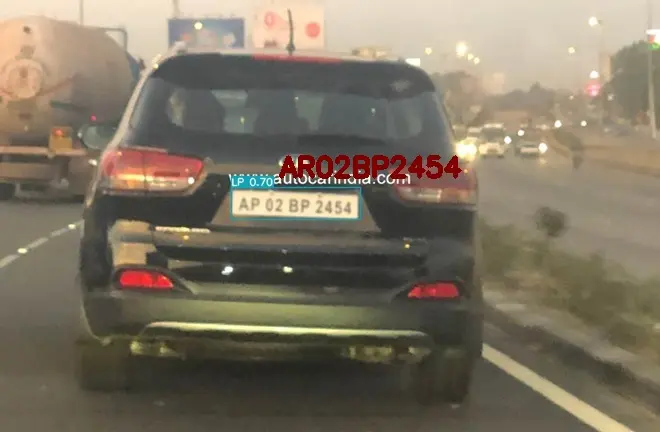
他會輸出判讀的車牌號碼還有信心值, 另外也會產生標記車牌的照片在 xxx_tagged.jpg, 如下.

-
照片中可以看到, 他把車牌中的 P 判讀成 R 了, 實際上應該還是要把車牌給 EasyOCR 重做一次 training, 可能會比較準.
-
ocr.py 程式內容如下, 邏輯其實並不複雜, 就是把照片和 bounding box 傳給 EasyOCR, 並附上一些參數 (如合法的字元等等), 然後再使用 cv2 把辨識出來的車牌寫回影像檔. (實際上, 這程式絕大多數都是 ChatGPT 寫的)
 1import argparse
 2import easyocr
 3import cv2
 4import os
 5
 6# Parse command-line arguments
 7parser = argparse.ArgumentParser(description='Read text from an image within bounding boxes')
 8parser.add_argument('image', help='Path to the image file')
 9parser.add_argument('bbox_file', help='Path to the bounding box file')
10parser.add_argument('--writecrop', action='store_true', help='Write cropped images')
11args = parser.parse_args()
12
13# Load the image
14image = cv2.imread(args.image)
15
16# Initialize the OCR reader
17reader = easyocr.Reader(['en'])
18
19# Read bounding box coordinates from the file
20with open(args.bbox_file, 'r') as f:
21    lines = f.readlines()
22    for i, line in enumerate(lines):
23        class_index, x, y, width, height = map(float, line.strip().split())
24        x_min = int((x - width / 2) * image.shape[1])
25        y_min = int((y - height / 2) * image.shape[0])
26        x_max = int((x + width / 2) * image.shape[1])
27        y_max = int((y + height / 2) * image.shape[0])
28
29        # Crop the image within the bounding box
30        cropped_image = image[y_min:y_max, x_min:x_max]
31
32        # Read text from the cropped image
33        result = reader.readtext(cropped_image, allowlist='ABCDEFGHIJKLMNOPQRSTUVWXYZ0123456789', decoder='wordbeamsearch', beamWidth=100)
34
35        # Check if text is detected
36        if len(result) > 0:
37
38            # Print the OCR result
39            text_to_write = ""  # Initialize an empty string
40            for text in result:
41                text_to_write += text[1] + " "  # Concatenate the detected texts with a space
42
43            text_to_write = text_to_write.strip()  # Remove leading/trailing whitespace
44
45            if text_to_write != "":
46                print(f'License plate: {text_to_write} (Score: {text[2]})')
47
48                # Write the selected text on the original image
49                cv2.putText(
50                    image,
51                    text_to_write,
52                    (x_min + 50, y_min - 10),
53                    cv2.FONT_HERSHEY_SIMPLEX,
54                    0.9,
55                    (0, 0, 128),
56                    4
57                )
58
59        # Write the cropped image if the writecrop parameter is set
60        if args.writecrop:
61            # Get the original filename without extension
62            filename = os.path.splitext(os.path.basename(args.image))[0]
63            # Construct the output filename for the cropped image
64            cropped_filename = f'{filename}_cropped{i+1}.jpg'
65            # Write the cropped image
66            cv2.imwrite(cropped_filename, cropped_image)
67
68# Save the modified image with the original filename appended with '_tagged'
69filename, extension = os.path.splitext(args.image)
70output_filename = f'{filename}_tagged{extension}'
71cv2.imwrite(output_filename, image)